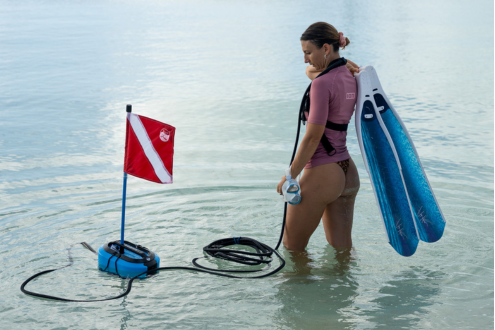
A floating air compressor, also called a portable dive system or surface-supplied air unit, delivers breathable air to a diver from a battery-powered, tankless platform that floats at the surface. Understanding how to care for this equipment is essential because cleaning, battery management, and mechanical inspection preserve airflow reliability, reduce corrosion, and extend operational life. Read on to learn practical, model-aware guidance for post-dive rinsing, routine inspections, battery charging and storage, troubleshooting common faults, and long-term winterizing to protect your floating dive compressor. This guide maps directly to daily checklists, every 3 months service tasks, battery-specific care, professional service triggers, troubleshooting flows, and where to find manufacturer training and support. Throughout, you will find step-by-step lists, decision tables, and recommended actions tailored to portable battery-powered hookah systems, with examples that mention the BLU3 Nomad Dive System where helpful to illustrate best practices.
Why Is Regular Maintenance Essential for Your Floating Dive Compressor?
Regular maintenance for a floating dive compressor prevents saltwater corrosion, preserves battery cycle life, and maintains consistent airflow so divers have reliable breathing gas at the surface. Saltwater exposure drives electrochemical corrosion of metal parts and accelerated wear of O-rings and hoses, so maintenance interrupts those mechanisms and reduces failure risk. Routine servicing also detects leaks and component fatigue early, which lowers overall lifecycle cost by avoiding emergency repairs and preserving resale value. Maintaining the compressor supports reliable operation by ensuring predictable regulator performance and uninterrupted air delivery. The next section provides the exact daily and post-dive steps you should follow to keep a floating compressor ready for the next dive.
For example, owners of the BLU3 Nomad Dive System report that disciplined post-dive rinsing and scheduled battery checks materially extend pump and Smart Reg life while protecting the unit’s saltwater-resistant parts and battery pack. This real-world example underscores how regular maintenance protects your investment and enhances dive reliability, and it leads naturally into the daily post-dive procedures that follow.
How Does Proper Care Extend the Life of Your BLU3 Nomad Dive System?
Proper care extends the life of a Nomad-style unit by removing salt and debris, preserving seal materials, and reducing stress on the proprietary pump and battery pack. Physically flushing salt from exposed components prevents crystallized deposits that abrade moving parts and degrade performance. Protecting the Smart Reg and air hose reduces micro-leaks that can force the pump to work harder, shortening component life. Regular battery charge management preserves usable cycles and avoids deep-discharge damage to pack chemistry, which keeps runtime within nominal specifications. These maintenance steps directly reduce repair frequency and sustain dependable dive times for surface-supplied, tankless diving setups.
How Does Maintenance Support Reliable Operation of Your Portable Hookah System?
Maintaining a portable hookah system improves operational reliability by ensuring steady airflow and preventing in-water failures caused by leaks, clogs, or battery depletion. Routine inspections catch brittle hoses, cut O-rings, and loose fittings that could introduce breathing resistance or sudden loss of supply if they fail during a dive. Verifying battery state-of-charge and connectors before each dive lowers the chance of an unexpected shutdown; this directly contributes to diver confidence and predictable performance. These benefits set the stage for discussing how maintenance also protects your financial investment in battery-powered diving gear.
How Does Maintenance Protect Your Investment in Battery-Powered Dive Compressors?
Maintenance protects your investment by extending battery and pump lifecycles, reducing emergency repair costs, and maintaining resale value through documented care. Replacing consumables like O-rings and hose clamps proactively is typically less expensive than addressing pump or regulator failures that result from neglect. Using proper cleaning and storage practices reduces corrosion and component replacement frequency, which lowers lifetime ownership costs. Keeping a maintenance log and following manufacturer-recommended service intervals preserves warranty eligibility and helps demonstrate the unit has been well cared for when you sell or trade. Next, learn the exact daily and post-dive steps that form the practical foundation of this preventive program.
What Are the Daily and Post-Dive Care Steps for Your Floating Air Compressor?
Daily and post-dive care focuses on simple, repeatable actions—rinsing saline, draining moisture, inspecting seals, and confirming battery readiness—that prevent immediate degradation and prepare the unit for storage. Performing these tasks after every saltwater dive preserves the Smart Reg, and battery contacts from salt buildup that accelerates wear. The sequence is straightforward and optimized for quick completion while still ensuring meaningful protection for components that are meronyms of the system: pump, Smart Reg, battery pack, air hose, and dry bag float. Below are clear, ordered steps to use as your routine checklist.
- Rinse externally with fresh water to remove salt and surface contaminants from the float and housing.
- Drain condensation or moisture collection points and plug the intake to prevent debris entry.
- Inspect hoses, O-rings, and battery connectors for visible corrosion or damage.
- Partially charge batteries to the recommended storage state-of-charge (SOC) if depleted and stow the unit in a ventilated, dry location out of direct sunlight.
These actions are compact but effective: rinsing reduces salt-induced corrosion, draining stops internal condensation damage, inspections catch wear early, and battery attention preserves cycles; next we will explain the specific rinse and cleaning steps for Nomad-style units.
How Do You Rinse and Clean the BLU3 Nomad After Saltwater Use?
Rinsing a Nomad-style unit involves leaving the battery connected, placing the unit in a tub of freshwater, and running it. Alternatively, spray a hose inside the unit as much as possible. This method ensures a thorough flush of the airflow path while sweeping away salt. After external rinsing, ensure the intake is plugged to prevent debris entry. Finish with a soft cloth to dry exposed parts and allow complete air-dry in shade before reassembly and storage. This rinse routine prevents deposit buildup that accelerates wear and sets up the next topic—what to inspect visually after each dive.
What Parts Should You Inspect After Each Dive?
After each dive, visually and tactilely inspect hoses for cracks, mouthpieces for tears, O-rings for flattening, float integrity for abrasions, and battery connectors for residue or corrosion. Look for stiffness or discoloration in hose materials, which signals UV or salt damage. Document findings in a brief log to track progressive wear and prepare for the every 3 months inspection steps that follow. Regular inspection completes the daily loop and informs moisture-control actions to stop corrosion.
How Do You Drain Moisture and Prevent Corrosion in Your Surface Supplied Air System?
Draining moisture involves emptying any condensation traps, tipping the airflow path to encourage drainage, and plugging the intake to prevent debris entry. If the unit has a condensation collection point, open and dry it after each dive and verify its seal when closed. Orient the unit so gravity assists in removing trapped water from low points, then ensure the intake is plugged to prevent debris entry. Store the system with vents open in a low-humidity area and consider desiccant packets in long-term storage to reduce ambient humidity that promotes corrosion. These moisture-control steps prepare the system for extended storage and segue naturally into battery-specific care considerations.
How Should You Maintain and Store the Battery for Your Portable Dive System?
Battery care for portable dive systems focuses on correct charging windows, storage state-of-charge, temperature control, and travel preparation to protect pack health and comply with transport rules. Proper battery maintenance reduces internal resistance growth, prevents capacity loss from deep discharge, and safeguards against thermal stress. Keep batteries within recommended temperature ranges, avoid prolonged full-charge or depleted storage, and follow pack-specific charging cadence to maximize usable cycles. Below is a compact reference table that pairs battery actions with recommended practices and the rationale for each.
Introductory battery care table:
| Battery Action | Recommended Practice | Rationale / Impact |
|---|---|---|
| Charge after use | Recharge to a safe state soon after diving, avoiding repeated full-discharge | Prevents deep-discharge stress and preserves cycle life |
| Storage SOC | Store at moderate SOC (approximately half charge) when out of service long-term | Reduces chemical stress and capacity fade during storage |
| Temperature control | Keep between cool and moderate temperatures; avoid extremes | Minimizes thermal degradation and preserves capacity |
| Connector inspection | Clean and dry connectors before storage | Prevents corrosion and poor electrical contact |
This table gives clear cause-and-effect guidance so you can protect battery longevity and prepare for travel; next we outline charging and storage best practices specific to BLU3 Nomad battery packs.
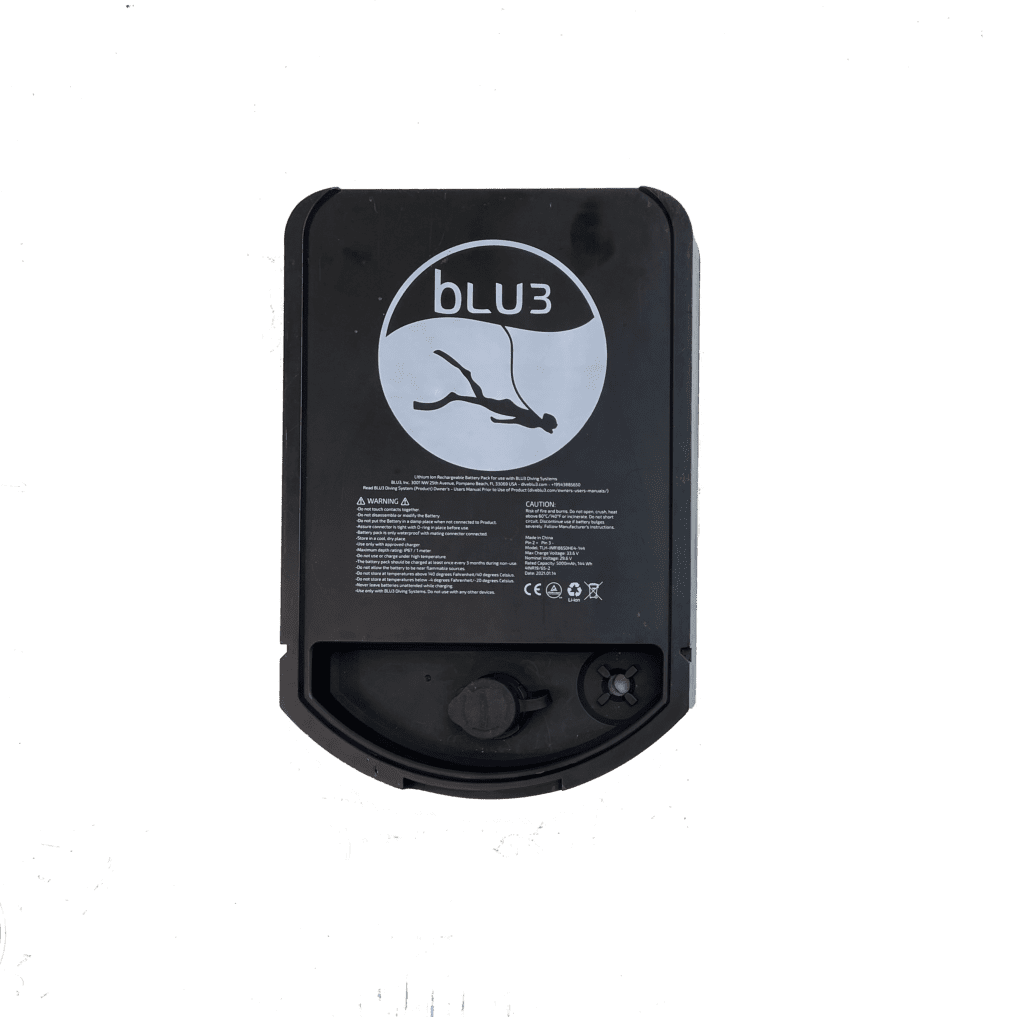
What Are the Best Practices for Charging and Storing BLU3 Nomad Battery Packs?
Charge BLU3 Nomad battery packs after use when partially depleted rather than allowing deep discharge, and store them at a moderate state-of-charge for long-term periods to reduce capacity loss. Use the manufacturer-recommended charger and observe ambient temperature limits during charging to prevent thermal stress. For storage, maintain the pack at the suggested SOC (commonly around half charge if the manual specifies), place it in a dry, ventilated area away from direct sun, and perform SOC checks every few months. Inspect connectors and housing for signs of swelling, damage, or corrosion before reuse, and consult BLU3 training resources for model-specific constraints. These practices set up the next list that outlines travel preparation for batteries.
Practical battery best-practices checklist:
- Store batteries at moderate SOC to reduce chemical stress.
- Use approved chargers and avoid charging in extreme heat or cold.
- Transport batteries in protective cases and carry them per airline guidelines.
- Inspect battery housings and connectors for physical damage before each trip.
Following these bullets reduces risk during transport and keeps battery performance predictable; the next subsection explains airline travel considerations.
How Can You Safely Travel with Your Battery on Airplanes?
When traveling by air with lithium battery packs, prefer carry-on transport and verify airline limits and documentation requirements in advance to remain compliant with current regulations. Pack batteries in protective cases, ensure terminals are covered or taped, and keep spare batteries in carry-on baggage rather than checked luggage to allow crew access in case of an issue. Confirm the battery’s capacity against airline and regulatory thresholds and declare the battery if required by carrier policy; some manufacturers provide travel guidance and documentation to assist travelers. Maintain battery separation from conductive materials and provide brief usage context to airline personnel if asked. These travel steps are critical before considering when to replace or service batteries for optimal performance. Review BLU3’s airplane travel certificate document and keep it handy during your travels.
When Should You Replace or Service Your Battery for Optimal Performance?
Replace or service a battery when run times noticeably shorten, the pack fails to hold charge, or physical anomalies such as swelling or warmth occur during charging or use. Track cycle counts and compare actual runtime to the nominal 45–60+ minutes per battery expectation for tankless systems; a consistent drop below useful thresholds signals servicing. If the pack exhibits abnormal heat, visible damage, or charging failures, take it out of service and consult authorized support for diagnostics. Regular performance tracking and timely replacement minimize in-water risk and preserve overall system reliability. Recognizing degradation patterns leads into the deeper every 3 months maintenance checklist below.
What Are the Every 3 Months Maintenance Checks for Your Floating Dive Compressor?
Every 3 months checks dig deeper: test hoses and O-rings, lubricate seals per manual, and perform a test run that measures airflow and identifies abnormalities. These checks cover mechanical inspection and preventive tasks that reduce emergent failures and preserve performance. Incorporate a brief functional test run under controlled conditions to detect abnormal noise, vibrations, or pressure behavior that indicate pump or regulator issues. The list below organizes key periodic tasks you can perform without professional tools, followed by a table that clarifies frequency and responsibility.
Key every 3 months checks include:
- Inspect the intake and plug it when not in use to prevent debris entry.
- Visually check hoses and O-rings for wear and replace as needed.
- Run a short functional test to verify consistent airflow and listen for unusual sounds.
- Log observations and schedule service if anomalies recur.
These periodic checks reduce progressive wear and introduce the maintenance schedule table with entity-attribute-value clarity.
| Component | Check Frequency | Action / Criteria |
|---|---|---|
| Intake | Per Use | Inspect for debris and plug when not in use. |
| Hoses | Every 3 Months | Inspect for cracking, stiffness, or abrasion; replace worn items |
| O-rings & Seals | Every 3 Months | Look for flattening or cuts; replenish spare O-rings as needed |
| Functional Run | Every 3 Months | Test run to confirm nominal airflow and absence of abnormal noise |
The table helps prioritize inspections and highlights that regular testing prevents unnoticed degradation; next we cover how to inspect and clean air passages.
How Do You Prevent Debris from Entering the Intake?
To prevent debris from entering the intake, always ensure the intake port is securely plugged when the unit is not in use. This simple step prevents sand, salt, and other particulates from accumulating in the system, which can otherwise lead to blockages and reduced performance. Regularly inspect the intake plug for proper fit and condition.
How Do You Check Hoses, O-Rings, and Connections for Leaks or Wear?
Perform a systematic visual and tactile inspection: look for surface cracks, and feel for soft spots or stiffening in hoses. Replace O-rings that show flattening, cuts, or loss of elasticity and carry matched spare sizes for field swaps. These checks, along with verifying proper seating, prevent micro-leaks that cause reduced airflow and pump strain. After these checks, consider the typical signs of wear that indicate full replacement.
What Are the Signs of Wear and Tear on Dive Hoses?
Signs of wear include visible cracking or fraying, exposed reinforcement layers in hoses, and loss of flexibility or increased brittleness in polymer components. Discolored or swollen areas can indicate chemical attack or UV degradation, and splices or heat-affected zones reveal prior damage. Replace suspect parts to preserve system integrity and reduce the need for professional servicing described in the next section.
When and How Should You Perform Professional Servicing and Parts Replacement?
Professional servicing is required when red-flag conditions appear—core pump failure, major leaks, or electrical anomalies that DIY procedures cannot safely resolve. Authorized service technicians have access to genuine replacement parts and manufacturer diagnostics that ensure correct repairs without voiding warranties. For the compressor itself, BLU3 does not provide replacement or spare parts; these components must be serviced by qualified technicians. Preparing a unit for service includes documenting usage patterns, and photographs of visible damage to accelerate diagnostics and improve quote accuracy. The guidance below clarifies when to seek BLU3 authorized service and why genuine parts matter for durability and warranty protection.
How Do You Know When to Seek BLU3 Authorized Service?
Seek BLU3 authorized service when you encounter frequent or persistent functional issues, physical damage to core components, battery anomalies, or any electrical faults beyond basic inspections. If simple troubleshooting does not resolve a recurring fault or if the pump produces unusual vibrations or heat, take the unit out of service and arrange professional diagnostics. Document serial numbers, observed symptoms, and recent usage to streamline the service process and to help technicians reproduce and diagnose the issue. Promptly contacting authorized service reduces potential secondary damage and aligns with warranty-preserving practices; next we explain why genuine parts are important.
Why Is Using Genuine BLU3 Replacement Parts Important?
Using genuine BLU3 replacement parts ensures material compatibility, corrosion resistance, and proper fit, which preserve performance characteristics designed into the system. Genuine components match the engineering tolerances for the proprietary pump, Smart Reg, and battery interfaces and reduce the risk of leaks, misfit, or accelerated wear from mismatched materials. Original parts also support warranty and service continuity since manufacturers typically require genuine components for covered repairs. Choosing genuine parts reduces long-term cost by maintaining efficiency and preventing premature failures that generic parts can accelerate. This leads naturally to a practical list of common repairs you might expect.
What Are Common Repairs and Replacements for Floating Air Compressors?
Common repairs include hose replacement, Smart Reg servicing, and battery servicing or pack replacement when capacity declines. Pump seal replacement and other internal compressor repairs must be handled by authorized technicians, as BLU3 does not provide replacement parts for the compressor itself. Hose sections and O-rings are consumables that often require periodic replacement based on wear. Regulator servicing restores precise pressure control and typically requires authorized technicians familiar with model-specific tolerances. Anticipating these items in your maintenance budget helps avoid surprise costs and prepares you to contact service when needed; next we present troubleshooting guidance for common BLU3 Nomad issues.
How Can You Troubleshoot Common Issues with Your BLU3 Nomad Dive System?
Troubleshooting focuses on symptom identification, rapid remedial steps, and clear escalation triggers to authorized service. By following a decision flow—confirm battery state, verify hose integrity, then check regulator function—you can often restore serviceable performance or determine that professional repair is required. The table below maps common symptoms to likely causes, immediate steps, and when to contact service, serving as a quick diagnostic triage for field use.
Troubleshooting table:
| Symptom | Likely Cause | Immediate Steps | When to Contact Service |
|---|---|---|---|
| Low airflow / reduced runtime | Debris in intake, hose leak, low battery | Check intake plug, check hose integrity, charge battery | If airflow not restored after checks |
| Pump issue / overheating | Overload, salt contamination | Power down, cool, rinse exterior, ensure intake is plugged. | If issue persists or pump runs hot again |
| Intermittent power or no start | Battery connection or pack failure | Inspect connectors, reseat battery, test with spare pack | If unit fails to start with good battery |
| Persistent regulator alarm | Smart Reg fault or internal leak | Inspect regulator for visible damage, confirm fittings | If alarm recurs after cleaning and reseating |
This table enables fast triage and clarifies when to escalate to BLU3 authorized technicians; next we expand on resolution steps.
How Do You Fix Limited Airflow or Compressor Performance Problems?
Limited airflow commonly stems from debris in the intake, restricted hoses, or low battery output; address these in a stepwise manner to isolate the root cause. First, verify battery state-of-charge and charge or swap packs if necessary, then ensure the intake is plugged and free of debris. Next, inspect hoses and listen for abnormal pump sounds during a short test run; replace any damaged hoses or seals. If basic checks and component swaps do not restore nominal airflow, prepare the unit for authorized service to inspect the pump and Smart Reg internals. These troubleshooting steps prepare you for quick field fixes and for contacting support if needed.
How Can You Detect and Repair Hose Leaks Quickly?
Detect hose leaks by looking for escaping air or by submerging connections briefly; perform repairs with temporary patches for transit and order replacements for permanent repair. For through-hose failure, isolate the damaged section and apply a field repair sleeve or secure with recommended marine-grade tape for short-term transit. Always replace patched hoses before the next dive, since field repairs are temporary and less reliable under pressure cycling. Having spare hose sections and O-rings on-hand speeds permanent repair and reduces downtime.
How Do You Winterize and Store Your Floating Air Compressor for Long-Term Care?
Winterizing and long-term storage prioritize full cleaning, moisture removal, battery care, and periodic inspections to prevent deterioration during inactivity. A complete procedure includes a thorough rinse, removal or partial charge of batteries, packing in dry protective covers, and placing desiccants in storage containers to control humidity, along with ensuring the intake is plugged. Periodically inspect stored equipment on an every 3 months cadence to detect early corrosion or battery condition changes and run a short functional test before reactivation to confirm operational readiness. The following subsections give step-by-step tasks for Nomad-style units, storage of batteries and components, and inspection cadence.
What Steps Are Needed to Prepare Your Nomad for Off-Season Storage?
Prepare a Nomad-style unit for off-season storage by performing a full freshwater rinse, removing batteries (or storing them at recommended SOC), packing the unit in a dry bag or protective cover, and ensuring the intake is securely plugged. Allow all components to air-dry fully in shade, verify that no salt remains in crevices, and remove any detachable consumables for separate storage. Store the main unit in a ventilated area out of direct sunlight and place desiccant packs near sensitive parts to reduce ambient moisture. Label the storage date and expected reinspection interval so you can systematically reactivate the unit when the season returns. These steps flow into how batteries and components should be stored to prevent damage.
How Should You Store Batteries and Components to Prevent Damage?
Store batteries at a moderate state-of-charge (approximately half charge if specified by the manual), in cool, dry conditions, and isolated from metal objects to prevent accidental short circuits. Keep delicate components like Smart Regs, and spare O-rings in sealed containers with desiccants to minimize humidity exposure and physical abrasion. Avoid packing batteries in sealed, warm containers where heat can accumulate, and perform SOC checks every few months to maintain an effective storage profile. Periodic visual inspections during storage detect condensation or corrosion early and prompt corrective drying or cleaning before reuse. These storage habits prepare you for timely inspections prior to reactivation.
How Often Should You Inspect Stored Equipment Before Use?
Inspect stored equipment every 3 months depending on ambient conditions: perform a visual check for corrosion, run a short operational test, and verify battery SOC before the first seasonal use. If stored in a humid environment, increase inspection cadence to every 3 months and replace desiccants as needed; in temperate, controlled storage, every 3 months inspections may suffice. Each inspection should include a brief functional run to ensure pumps run smoothly, regulators show expected behavior, and hoses remain flexible. Charging batteries to the recommended pre-dive SOC and confirming seals before initial use completes the reactivation process. Regular inspections ensure stored gear returns to service reliably.
Frequently Asked Questions
How can I ensure my battery lasts longer during dives?
To extend your battery’s lifespan, charge it soon after use to avoid deep discharge, which can damage the pack. Store the battery at a moderate state-of-charge, ideally around half, when not in use. Keep it in a cool, dry place, and regularly inspect connectors for corrosion. Following these practices helps maintain battery health and ensures reliable performance during dives, allowing you to maximize your underwater time.
What are the signs that my hoses need to be replaced?
Signs that your hoses may need replacement include visible cracks, fraying, or exposed reinforcement layers. Additionally, if hoses feel stiff or brittle, or if you notice discoloration, these are indicators of wear. Regularly inspect hoses for leaks, and replace any that show signs of damage to prevent failures during dives. Keeping spare hoses on hand can help minimize downtime and ensure reliability.
How do I prepare my floating air compressor for long-term storage?
To prepare your floating air compressor for long-term storage, perform a thorough rinse with fresh water, remove the battery or store it at the recommended state-of-charge, and pack the unit in a dry, ventilated area away from direct sunlight. Ensure the intake is securely plugged. Allow all components to air-dry completely, and consider using desiccant packs to control humidity and label the storage date for future reference. Regular inspections during storage can help catch any issues early.
What maintenance tasks should I perform every 3 months?
Every 3 months, focus on inspecting hoses and O-rings for wear. Additionally, perform a functional test run to verify consistent airflow and listen for unusual sounds. Logging observations during these checks helps track the condition of your equipment and schedule necessary repairs, ensuring your floating dive compressor remains in optimal working condition.
How can I troubleshoot low airflow issues with my compressor?
To troubleshoot low airflow issues, first check the battery state-of-charge and charge or replace it if necessary. Next, ensure the intake is free of debris, and examine hoses for leaks. If airflow does not improve after these checks, prepare the unit for professional service to inspect the pump and regulator for internal issues.
What should I do if my Smart Reg is not functioning properly?
If your Smart Reg is not functioning correctly, start by inspecting it for visible damage and ensuring all parts are secure. Clean the regulator gently with fresh water and allow it to dry completely. If issues persist, consult the troubleshooting section of your manual for specific symptoms. If necessary, take the unit out of service and contact authorized support for professional diagnostics and repairs to ensure reliable operation.
How Often Should You Rinse Your Floating Air Compressor?
Rinse a floating air compressor after every dive, because salt crystallization and other chemicals like chlorine accelerates corrosion and fouling. Rinsing after each exposure removes corrosive salts from exterior surfaces and reduces the risk of internal deposit formation after purge. Freshwater rinsing combined with ensuring the intake is plugged minimizes salt buildup inside hoses and regulators. Establishing a rinse-every-dive habit is the most effective preventive measure and leads into recommended Smart Reg cleaning procedures.
How Can You Prevent Saltwater Corrosion on Your Portable Dive System?
Prevent saltwater corrosion by rinsing after each exposure, thoroughly drying components, and storing in low-humidity areas. Regularly inspect exposed metal parts for early signs of oxidation. Using manufacturer-recommended materials and genuine replacement parts reduces galvanic mismatch that accelerates corrosion. These habits form a proactive corrosion-control program that complements periodic professional servicing.
What Are the Best Practices for Battery Care and Air Hose Maintenance?
Best practices include charging batteries after use, storing them at an appropriate SOC for long-term storage, inspecting connectors regularly, and replacing hoses at first sign of cracking or exposed reinforcement. Maintain spare O-rings and perform visual checks on hoses during routine inspections to detect leaks early. Keep hose routing free of sharp bends and avoid contact with abrasive surfaces to extend service life. These combined habits preserve both energy supply and gas delivery integrity and naturally lead to available manufacturer resources and training.
Where Can You Find Additional Resources and Support for Your BLU3 Dive System Care?
For deeper learning, authorized servicing, and parts information, consult BLU3’s official support channels that focus on reliable operation and model-specific servicing. Manufacturer-provided resources such as online dive training courses supplement the owner’s manual with practical demonstrations and operational modules tailored to portable, battery-powered tankless dive systems. When complex repairs or replacements are required, BLU3-authorized service centers and genuine replacement parts preserve warranty and performance expectations. Below are specifics about service center location methods, and how customer support can assist.
Where Are BLU3 Authorized Service Centers Located?
Locate BLU3 authorized service via the company’s official support channels and resources; authorized centers are the recommended route for diagnostics, warranty work, and genuine parts replacement. When preparing to contact service, gather the unit serial, recent usage, and photos of any visible damage to speed diagnosis and quoting. Authorized centers use factory procedures to test pumps, Smart Reg components, and battery packs to return the unit to manufacturer standards. Working with authorized service preserves designed corrosion-resistant material choices and avoids risks of non-genuine parts.
How Can Customer Support Help with Maintenance and Troubleshooting?
Customer support can assist with diagnostics, parts ordering, scheduling authorized service, and clarifying training material to help owners decide between simple DIY fixes and professional repairs. Provide symptoms, photos, and a summary of recent usage when contacting support to accelerate troubleshooting and receive accurate guidance. Support teams can direct users to the correct procedural steps, help identify consumables for replacement, and advise on service timelines. Good support interaction reduces downtime and ensures maintenance follows manufacturer-recommended practices.
- BLU3 is positioned as an e-commerce and information hub specializing in portable, battery-powered tankless diving systems designed and assembled in Florida.
- The BLU3 Nomad Dive System exemplifies portability, tankless diving freedom with extended underwater time per battery, and parts designed for saltwater resistance.
- For owners choosing a Nomad-style system, combine the procedures above with manufacturer training to maximize longevity and reliable performance.
These resources and manufacturer-aligned practices help you buy, maintain, and operate a portable dive system with confidence, applying the care protocols described throughout this guide.
Conclusion
Proper maintenance of your floating air compressor not only extends its lifespan but also ensures reliable performance during dives. By following the outlined care procedures, you can significantly reduce the risk of equipment failure and enhance your overall diving experience. Take the next step in safeguarding your investment by exploring our range of maintenance resources tailored for your BLU3 Nomad Dive System. Equip yourself with the knowledge and tools necessary for optimal care and enjoy confidence on your underwater adventures.